
7 Tips to Make the Web More Readable on an iPhone
7 Tips to Make the Web More Readable on an iPhone: You probably spend more time reading on your iPhone than you do texting, calling, or playing games. Most of that content is likely on the web, and it’s not always easy to see or scroll through. Fortunately, there are plenty of hidden features that can make reading on your iPhone a much more pleasant experience.
Use Safari’s Reader View
Safari is the default browser on iPhone. One of the best reasons to stick with Safari over a third-party browser is its Reader View. This mode reformats web pages to make them more digestible. It gets rid of all the distractions on the page and just shows you the content.
Some other browsers might offer Reader View, but Google Chrome doesn’t.

When you land on a web article or similarly written content in Safari, the address bar will display “Reader View Available” for a few seconds. If you tap the icon to the left of this alert, you’ll enter Reader View immediately.
Alternatively, tap and hold “AA” for a second to jump straight to Reader View. You can also tap “AA” in the address bar and choose Show Reader View.
While you’re in Reader View, you can tap “AA” again to see some options. Tap the smaller “A” to shrink the text, or the larger “A” to enlarge it. You can also tap “Font,” and then choose a new one from the list that appears.
Finally, tap on a color (white, off-white, gray, or black) to change the Reader Mode’s color scheme.

When you change these settings, they’ll change for all the websites you view in Reader View. To get back to the original webpage, tap “AA” again, and then choose “Hide Reader View.”
Force Reader Mode Automatically for Specific Websites
If you tap “AA,” and then tap “Website Settings,” you can enable “Use Reader Automatically.” This forces Safari to enter Reader View whenever you visit any page on that domain in the future.
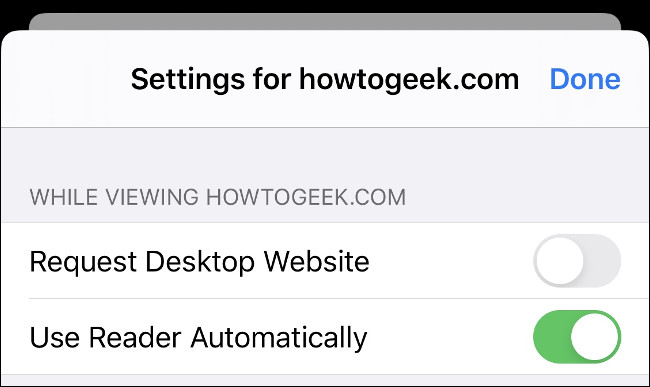
Tap and hold “AA” to return to the originally formatted website. Safari will remember your choice for future visits.
Use Reader View to Display Problem Webpages
Reader View is useful when navigating distracting websites, but it also works for content that doesn’t display properly. Although much of the web is mobile-friendly, many older websites are not. Text or images might not display correctly, or you might be unable to scroll horizontally, or zoom out to view the whole page.
Reader View is a great way of grabbing that content and displaying it in a readable format. You can even save pages as highly readable PDF documents. To do so, enable Reader View, and then tap Share > Options > PDF. Select “Save to Files” from the Actions list. This also works to print via Share > Print.
Make Text Easier to Read
If you’d like to make text easier to read across your whole system, rather than having to rely on Reader View, your iPhone also includes a lot of accessibility options under Settings > Accessibility > Display and Text Size.

“Bold Text” makes text easier to read without increasing its size. However, you can also tap “Larger Text,” and then slide the slider to increase text size overall, if you prefer. Any apps that use Dynamic Type (like most of the content on Facebook, Twitter, and news stories) will honor this setting.
“Button Shapes” places the outline of a button beneath any text that is also a button. This can help with readability and navigation. Other options you might want to enable include:
- “Increase Contrast”: Makes text easier to read by increasing the contrast between the fore- and backgrounds.
- “Smart Invert”: Inverts the color scheme (except on media, like photos and videos).
- “Classic Invert”: The same as “Smart Invert,” except it also inverts the color scheme on media.
Get Your iPhone to Read to You
Why read when you can listen? Apple’s phones and tablets include an accessibility option that will read the current screen, web page, or copied text aloud. While this is first and foremost an accessibility feature for the visually impaired, it has broader applications for consuming written content.
Head to Settings > Accessibility > Spoken Content. Here, you can enable “Speak Selection,” which allows you to highlight text, and then tap “Speak.” If you toggle-On “Speak Screen,” your iPhone will read the entire screen aloud whenever you swipe down from the top with two fingers.
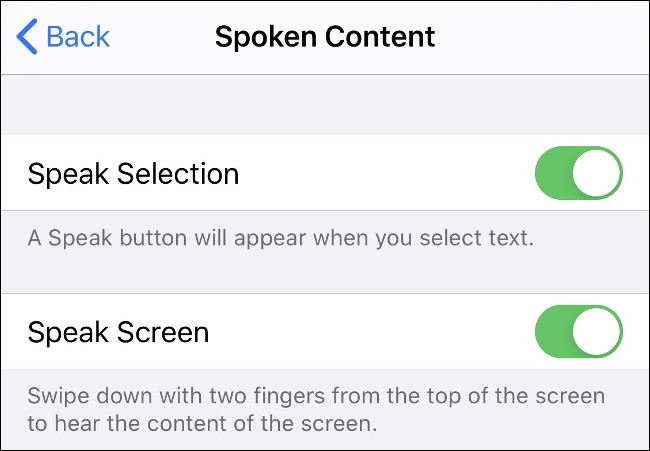
You can also enable “Highlight Content,” which shows you which passage of text is currently being read aloud. Tap “Voices” to customize the voices you hear. By default, “English” will mirror your current Siri settings.
There are many different voices available, some of which require an additional download. You can also select different accents depending on your region, such as “Indian English,” “Canadian French,” or “Mexican Spanish.” From our tests, Siri provides the most natural-sounding text-to-speech, with the “Enhanced” voice packs coming in second.
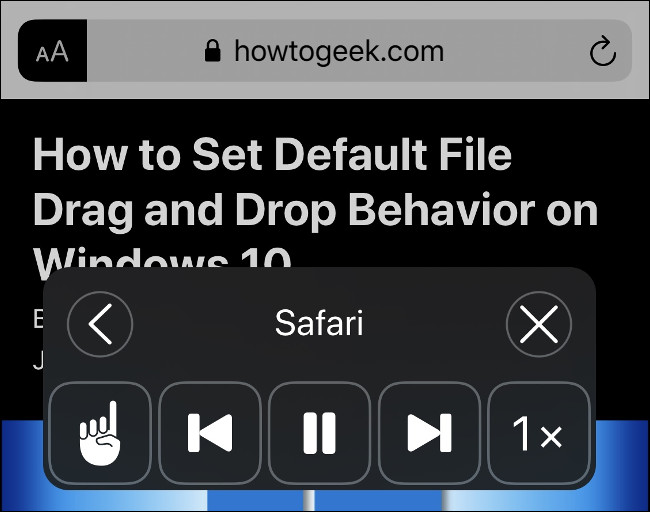
When you highlight text and choose “Speak” or swipe down from the top with two fingers, the Speech Controller will appear. You can drag and reposition this small box anywhere you want it. Tap it to see options to silence speech, skip backward or forward through an article, pause the speaking, or increase/decrease the speed at which the text is being read.
The “Speak Screen” feature works best when paired with Reader View. In regular view, your iPhone will also read descriptive image text, menu items, adverts, and other things you probably don’t want to hear. By triggering Reader View first, you can cut straight to the content.
“Speak Screen” works intuitively based on whatever is currently on the screen. For example, if you’re reading an article, and you are halfway through, triggering “Speak Screen” will begin reading based on how far down the page you are. The same is true for social feeds, like Facebook or Twitter.
While the iPhone’s text-to-speech options are still a bit robotic, the English voices sound a lot more natural than they once did.
Ask Siri to Provide a News Update
Sometimes, searching for news can be a chore. If you’re in a rush and want a quick update (and you trust Apple’s curation techniques), you can just say “give me the news” to Siri at any time to see a list of headlines from the News app. This works great in the U.S., but it might not be available in other regions (like Australia).
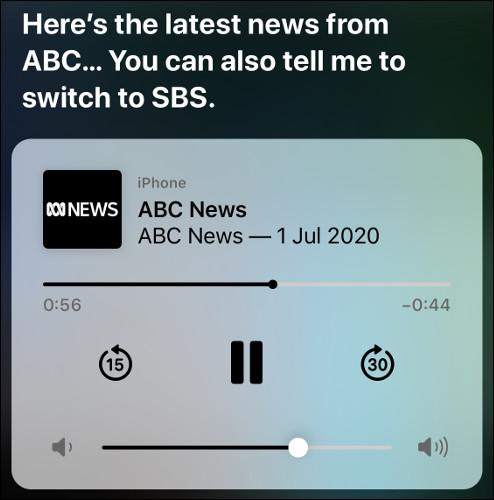
You can also launch the News app (or your favorite alternative), and then have your iPhone read aloud with “Speak Screen” or “Speak Selection.” Sometimes, though, it’s nice to hear a real human voice—just ask Siri to “play news” to listen to an audio update from a local station.
Siri will give you an alternative news source to switch to, if available, and it will be remembered the next time you ask for an update.
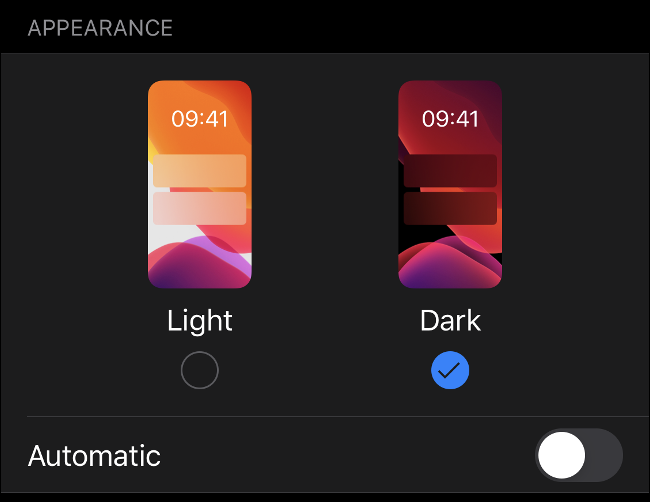
Dark Mode, True Tone, and Night Shift Can Help
Using your iPhone at night in a dark room became a lot more pleasant with the arrival of Dark Mode on iOS 13. You can enable Dark Mode on your iPhone under Settings > Display and Brightness. If you’d like Dark Mode to enable when it gets dark outside, choose “Automatic.”
Below the “Dark Mode” options is a toggle for “True Tone.” If you enable this setting, your iPhone will automatically adjust the white balance onscreen to reflect your ambient environment. This means the screen will look a lot more natural and match any other white objects in your surroundings, like paper. “True Tone” makes reading a less jarring experience, particularly under fluorescent or incandescent lighting.
Finally, “Night Shift” won’t make reading easier, but it might help you drift off to sleep. This is especially useful if you read in bed. “Night Shift” removes blue light from the screen to simulate the setting sun, which might help your body naturally switch off at the end of the day. A warm orange glow is a lot easier on your eyes, either way.
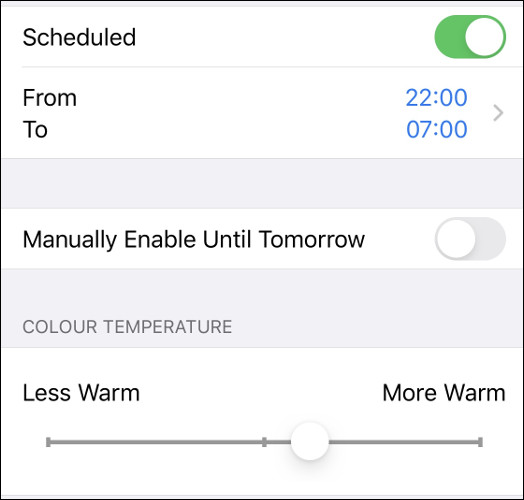
You can enable “Night Shift” in “Control Center,” or set it automatically under Settings > Display and Brightness. Just adjust the slider until you’re happy with the setting.
Keep in mind that “Night Shift” will also change how your photos and videos are displayed until you turn it off again, so don’t do any serious editing when it’s enabled.
Accessibility Is One Reason to Choose iPhone
Most of these features are available as a result of Apple’s ever-improving accessibility options. However, these features are just the tip of the iceberg; there are many hidden accessibility options you can explore. One of the most exciting recent arrivals is the ability to use your mouse or another pointing device with your iPhone and iPad.


Leave a reply