How to Make a Poster Using Microsoft PowerPoint
Microsoft PowerPoint isn’t just for presentations—it also provides all of the creative tools you need to design a beautiful poster. Just set the dimensions, design the poster, and print it out. Here’s how to make a poster using PowerPoint.
Define the Poster Dimensions
Posters come in all sizes, but the first thing you need to know is PowerPoint’s slide limit is 56-inches x 56-inches, so you’ll need to plan accordingly. It’s also important to note that you want to set your poster dimensions before you start designing your poster. Otherwise, you might end up having to rework parts of your design due to the size change.
RELATED: What Your Function Keys Do In Microsoft Excel
Here are some of the standard poster sizes to get you started:
- Small poster: 11” x 17”
- Medium poster: 18” x 24”
- Large posters: 24” x 36” or 27” x 39”
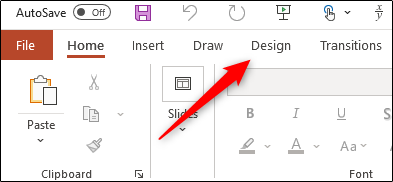
Once you’ve decided on your poster size, set the dimensions in PowerPoint. To do this, open PowerPoint and navigate to the “Design” tab.
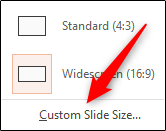
In the “Customize” group, select “Slide Size.”

Select “Custom Slide Size” from the dropdown menu.
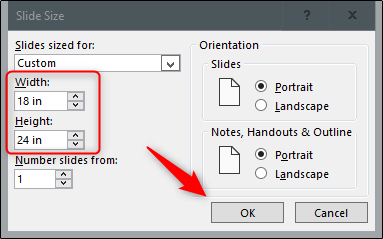
The “Slide Size” window will appear. Input the width and height specifications to match your required size. Keep in mind that if your height is larger in size than your width, the orientation of the slide will automatically change to “Portrait.”
When you’re finished, select “OK.”
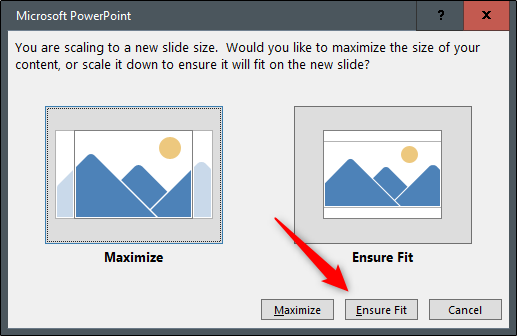
Once selected, a new window will appear giving you two scaling options: Maximize or Ensure Fit. If your slide already has content on it, you’ll want to select “Ensure Fit.”
Your slide will now be resized.
Design your Poster
Your poster design is going to depend completely on you. You’ll want to pay attention to the background of the poster, text and image arrangement, font size and style, etc. Essentially, you should treat this part exactly as if you were just creating another slide for a presentation.
Because the design and process of this step is going to differ for everyone, we’d like to offer some of our previous guides to get you started in the design process:
- Insert a picture or other object.
- Use an image as a background.
- Insert an image inside text.
- Get a picture behind text.
- Make a border or frame.
Once your design is ready, all that’s left to do is print it out and hang it up!


Leave a reply